Quantcast
Channel: Diethard Steiner on Business Intelligence
Viewing all 85 articles
Browse latest View live

Pentaho PostgreSQL Bulk Loader: How to fix a Unicode error

$
0
0

When using the Pentaho PostgreSQL Bulk Loader step, you might come across following error message in the log:

INFO  26-08 13:04:07,005 - PostgreSQL Bulk Loader - ERROR {0} ERROR:  invalid byte sequence for encoding "UTF8": 0xf6 0x73 0x63 0x68
INFO  26-08 13:04:07,005 - PostgreSQL Bulk Loader - ERROR {0} CONTEXT:  COPY subscriber, line 2


Now this is not a problem with Pentaho Kettle, but quite likely with the default encoding used in your Unix/Linux environment. To check which encoding is currently the default one, execute the following:


$ echo $LANG
en_US


In this case, we can clearly see it is not an UTF-8 encoding, the one which the bulk loader relies on.


So to fix this, we just set the LANG variable in example to the following:


$ export LANG=en_US.UTF-8


Note: This will only be available for the current session. Add it to ~/.bashrc or similar to have it available on startup of any future shell session.

Run the transformation again and now you will see that the process just works flawlessly.

Book Review: Instant Pentaho Data Integration Kitchen

$
0
0
There are more and more books being published on Pentaho these days. This time, a little book called Instant Pentaho Data Integration Kitchen (ca. 76 pages) by Sergio Ramazzina is making its way into the hands of many eager Pentaho fans. This books provides a detailed overview of using the kitchen and pan utilities. It is a short practical book (everything is explained based on examples) that covers all the essential and some advanced topics (quite frankly, probably everything there is to say about these utilities) and I definitely give it big thumbs up! It makes a really nice introduction for somebody who is new to these utilities and even covers some advanced topics (like execution of archived jobs and transformations) for the seasoned user. All this is beefed up with some nifty tips and tricks!

Going Agile: Pentaho Community Build Framework (CBF)

$
0
0

Going Agile: Pentaho Community Build Framework (CBF)

Info Sources

Why

CBF is an excellent tool to automate the build of your Pentaho BI/BA servers. Say you have various environments like dev, test, prod and you want an easy way of configuring and building your servers automatically, then CBF is for you.

Create basic folder structure

http://www.webdetails.pt/ctools/cbf.html provides a tar file with the basic structure. Download this file and extract it in a convenient location. Follow all the basic install instructions mentioned on this page.

Replace the build.xml file

Currently the quickstart package ships with an old version of the build.xml, which you have to replace:

cd cbf-quickstart
rm build.xml
wget --no-check-certificate https://raw.github.com/webdetails/cbf/master/build.xml

Setup project

Navigate inside the cbf-quickstart folder and rename the project-client folder to something more meaningful/project specific (by changing client to the real client or project name, i.e. project-puma).

Setup configs for different environments

To create configs for different environments, create build properties files for each of them:
project-*/config/build-*.properties

In example:
project-puma/config/build-dev.properties
project-puma/config/build-test.properties
project-puma/config/build-prod.properties

You can use the existing build.properties as a template. For now you will not have many properties in these files, once we start working on the patches, we will be able to added many more properties to these files.

Provide patch files

Patch files are all those files that you want CBF to replace in the original generic source packages. This can be completely static files (in example PDR jar library) but more importantly all these config files etc for which you want to have different settings on the various environments. You can copy these files in to the respective folders (solution for pentaho-solution and target-dist/server for all the Tomcat or JBoss related config files (by retaining the original folder structure). Once copied there, you can make these files’ content dynamic by adding tokens (syntax: @token@) for the config settings that you want to define.

Example web.xml (which is already part of the cbf-qickstart package):

This file was put into following folder:  
project-*/patches/target-dist/server/webapps/pentaho/WEB-INF/web.xml

As you can see, we retain the full folder structure for the web.xml.

Example of a token you could set in this file:
       <context-param>
               <param-name>solution-path</param-name>
               <param-value>@solution.deploy.path@</param-value>
       </context-param>

The value for this token is set in project-*/config/build-*.properties:
solution.deploy.path = ../../solution/

If required, you can add other files and tokenize them in similar fashion.

Where do you get these files from you wonder? Simply build the BI server once without any special settings are download a compiled version of it (i.e. from sourceforge.net).

Examples of relevant files that you want to have various versions of depending on the environment (as said these are example, your milage may vary):

Solution:

biserver-ce/pentaho-solutions/system/publisher.xml
biserver-ce/pentaho-solutions/system/olap/datasources.xml

biserver-ce/pentaho-solutions/system/applicationContext-spring-security-jdbc.xml

biserver-ce/pentaho-solutions/system/applicationContext-spring-security-hibernate.properties
biserver-ce/pentaho-solutions/system/hibernate/hibernate-settings.xml
biserver-ce/pentaho-solutions/system/hibernate/mysql5.hibernate.cfg.xml
biserver-ce/pentaho-solutions/system/hibernate/oracle10g.hibernate.cfg.xml
biserver-ce/pentaho-solutions/system/hibernate/postgresql.hibernate.cfg.xml

biserver-ce/pentaho-solutions/system/mondrian/mondrian.properties
biserver-ce/pentaho-solutions/system/olap/datasources.xml

biserver-ce/pentaho-solutions/system/quartz/quartz.properties

biserver-ce/pentaho-solutions/system/sessionStartupActions.xml

If required, you can remove all the startup actions from this last file. The beans part will then look like this:

<beans>
   <bean id="sessionStartupActionsList" class="java.util.ArrayList">
       <constructor-arg>
           <list>
           </list>
       </constructor-arg>
   </bean>
</beans>


Web Server:

Type
Original folder/file
CBF folder/file
web.xml
/tomcat/webapps/pentaho/WEB-INF/web.xml
target-dist/server/webapps/pentaho/WEB-INF/web.xml
JDBC Drivers
tomcat/lib
target-dist/server/lib
JDNI Database connections: Add resource entry for each connection you want to define
tomcat/webapps/pentaho/META-INF/context.xml
target-dist/server/webapps/pentaho/META-INF/context.xml

Providing different files for each environment (optional)

In the standard setup only one patch folder exists:
project-client/patches

This should be fine as long as you don’t need specific versions of static files in the various environments. In example, you might want to test the latest stable version of the PRD library on the test environment whereas your production environment is still on the previous version.

Pro-tip by Pedro Alves:

I'd leave the current patches dir as is but add another feature:

project-client/patches-${extraPatchesDir}

That way, on your cbf config file you could have:

useExtraPatchesDir = true
extraPatchesDir = dev (or whatever)

and you'd add the patch files to that dir. Then CBF would apply the standard patches first and then the extraPatches.

DS: So this would translate in following folder structure in example:
project-puma/patches-dev
project-puma/patches-test
project-puma/patches-prod

Get Pentaho BI Server source code

Within the top level CBF folder create a folder for storing the required version of the Pentaho BI server:

cd cbf-quickstart
mkdir pentaho-4.8
svn co http://source.pentaho.org/svnroot/bi-platform-v2/tags/4.8.0-stable/ ./pentaho-4.8

Add Ctools

There is no separate installation necessary. Andrea Torre kindly added support to the CBF ant file to install C* Tools (see this blog post).
In the build-*.properties file you can specify if ctools should be installed after the cbf build and you can specify which branch you want to use (defaults to stable):
ctools.install = true
ctools.branch = dev
Alternatively, if you require some specific parameters of the c-tools installer which are not covered by the ant script (in example currently you cannot specify specific components), you will have to run the c-tools-installer yourself, in example:
rm -rf ctools
mkdir -p ctools/system
./ctools-installer.sh -b stable -c cdf,cda,cde,cgg, cdb,saiku,saikuadhoc -s ctools -y -n

Later on you can write a custom shell script to install these files automatically into the target-dist/solution.

Installing Tomcat

You can install Tomcat anywhere on your system, it doesn’t have to reside in the cbf-quickstart folder. To reference your Tomcat installation, add (example):
tomcat.path = /usr/share/tomcat
to project-*/config/build-*.properties

If you have not Tomcat installed yet, go to the Tomcat Version 6 Download Page and choose the Binary Distribution > Core > Zip or tar.gz.

Once the file is downloaded, navigate to the cbf-quickstart directory and run:
cp ~/Downloads/apache-tomcat-6.0.37.zip .
unzip apache-tomcat-6.0.37.zip

In this case, you should reference Tomcat like this in the project-*/config/build-*.properties:
tomcat.path = ../../apache-tomcat-6.0.37

Finish configuring CBF

The build.properties file located in project-*/config holds all the essential settings for your project. As mentioned before, you can also create specific build properties files for each environment, which inherits from the main build.properties file (properties in build-*.properties override those in build.properties). Make sure you finished configuring all the properties now!

vi project-*/config/build-*.properties

tomcat.path = /usr/share/tomcat
pentaho.dir = pentaho-4.8
solution.path = project-client/solution/
#Example of a token:
solution.deploy.path = ../../solution/

Build

Now it is time to run the Ant build:
ant -Dproject=<project-name> -Denv=<environment-name> dist-clean all

Replace <project-name> and <environment-name> with the respective real world names.

Remember: the <project-name> has to be the same as to define for the project folder (in example: project-puma). <environment-name> has to be from one of the build properties files that you created (i.e. one we used here is build-dev.properties). Following our example, this would be:
ant -Dproject=puma -Denv=dev dist-clean all

Target (Build) Options

(This section is mostly copied from the CBF website for completeness sake)
See all available target options:
$ ant -Dproject=<project-name> -Denv=<environment-name> -p

Doing a full compile
When we want to "start from scratch", with a clean system, this is the command to use:

$ ant -Dproject=<project-name> -Denv=<environment-name> dist-clean all

Start the project after compiled
This will simply start tomcat

$ ant -Dproject=<project-name> -Denv=<environment-name> run

Full compile and start server
You can guess this one:

$ ant -Dproject=<project-name> -Denv=<environment-name> dist-clean all run

Deploy to a remote server, solutions only
$ ant -Dproject=<project-name> -Denv=<environment-name> dist-clean deploy-solutions

Apply the patches only without a full compile
No need to do the dist-clean here.

$ ant -Dproject=<project-name> -Denv=<environment-name> copy-init run

Full deploy to a remote server
This will transfer both server and solutions.

$ ant -Dproject=<project-name> -Denv=<environment-name> dist-clean deploy-all
Ctools build targets (source):
ctools-installer: Install ctools (prompts for modules)
ctools-installer-auto: Install ctools silently
ant -Dproject=<project-name> -Denv=<environment-name> ctools-installer

Fixing Build Errors

Blacklisted class javax.servlet.Servlet found

If you get an error message like this one:
BUILD FAILED
/opt/pentaho/cbf/cbf-quickstart/build.xml:374: The following error occurred while executing this line:
/opt/pentaho/cbf/cbf-quickstart/target-build/bi-platform-assembly/build-res/assembly_shared.xml:19: !!! Blacklisted class javax.servlet.Servlet found in a retrieved jar.  Assembly cannot proceed !!!

Solution:

mkdir -p project-client/patches/target-build/bi-platform-assembly/build-res

cp pentaho-4.8/bi-platform-assembly/build-res/assembly_shared.xml project-client/patches/target-build/bi-platform-assembly/build-res

Copy the contents of the assembly_shared.xml in there and add following argument:
<available property="Servlet.class.present" classname="javax.servlet.Servlet" ignoresystemclasses="true">

Deploying to the various environments

CBF offers 2 methods of deploying the build (fully configured BI server) or only the solution to the various servers (i.e. test, prod). One of them is rsync - see for CBF details. CBF comes with a feature to build RPMs (see here).

Register Plugins once server started

Without registering the plugins you might get following error message when opening a report:

ERROR [GenericServlet] GenericServlet.ERROR_0004 - Resource /reporting/reportviewer/cdf/cdf-module.js not found in plugin reporting


In the following order:
  1. Refresh solution repository
  2. Refresh the plugin adapter
  3. Refresh system settings

Recommended folder structure with Git

Why git? Version control - enough said - it should be part of every project. Read this excellent blog post by Pedro Alves (CBF and Versioning - How to develop Pentaho solutions in a team)

Usually you will have one git repo per client project. Inside the project folder create a folder called cbf and add a .gitignore file with following content (this setup was kindly suggested by Paul Stoellberger):
target-dist/*
target-build/*
apache*
pentaho-*
solution/*

Once you ran the shell script - which we will talk about in a second (see next section) - you will have following files and folders inside your cbf folder:

folder name
description
in git
apache-tomcat
tomcat web server
N
biserver-ce-4.8
Holds the biserver source code
N
data
Holds the sql files to create the Pentaho repository DB and quartz DB (excludes any hypersonic shell scripts). This folder was copied over from a BI server installation downloaded from sourceforge.net
N (although, on one occasion I had to add a bug fix in which case I put it on git)
project-*
project specific folders
Y
scripts
This folder holds custom created start and stop scripts for the BI server (not part of CBF)
Y
build-client-dev.sh
This is a custom created shell script which further automated the build for a specific project (and environment)
Y
build.xml
Ant build xml, part of CBF
N

Further automate the build using a shell file


Please find below a sample of a custom created build-*-*.sh file. This example was kindly provided by Paul Stoellberger:

#!/bin/sh

## Custom script - created by Paul - not included in original CBF

# if not done - check out pentaho 4.8
if [ -d "pentaho-4.8" ]
then
  echo "Found pentaho-4.8"
else
   echo "Checking out pentaho-4.8 sources...."
   svn checkout svn://source.pentaho.org/svnroot/bi-platform-v2/branches/4.8/ pentaho-4.8
fi

# svn checkout svn://source.pentaho.org/svnroot/bi-platform-v2/branches/4.8/ pentaho-4.8


# do we have a tomcat?
if [ -d "apache-tomcat" ]
then
  echo "Found tomcat"
else
   echo "Downloading tomcat....."
   wget http://tweedo.com/mirror/apache/tomcat/tomcat-6/v6.0.37/bin/apache-tomcat-6.0.37.tar.gz
   tar -xf apache-tomcat-6.0.37.tar.gz
   mv apache-tomcat-6.0.37 apache-tomcat
   rm apache*.gz
fi


rm -rf ctools-installer.sh

rm -rf solution
mkdir solution

# build the package
ant -Dproject=aaa -Denv=dev dist-clean all


# custom c-tools installation
wget https://raw.github.com/pmalves/ctools-installer/master/ctools-installer.sh
mkdir solution/system
sh ctools-installer.sh -b stable -s solution/ -c cdf,cda,cde,cgg,saiku,saikuadhoc -y -n

# copy over our solution and patches
cp -r ../pentaho-solutions/* solution/

# copy over sql scripts to create repository, hibernate and quartz (added by DS)
cp -R data target-dist
cp scripts/* target-dist/

# copy over solution folder
mv solution/ target-dist/solution/

chmod +x target-dist/*.sh
chmod +x target-dist/server/bin/*.sh

# copy over sql scripts to create repository, hibarnate and quartz (added by DS)
cp -r data target-dist

# cleanup
# we dont need the kettle plugins - way too big
rm -rf target-dist/solution/system/kettle/plugins/*
rm -rf target-dist/solution/system/BIRT
rm -rf target-dist/licenses

# package it all up into tar.gz
#mkdir dist
#tar zcf aaa-package.tar.gz -C target-dist .
#mv aaa-package.tar.gz dist/

BI server runtime errors

For some unknown reason my CBF build was not quite cheering up with c-tools. Basically when I opened CDE I could see the interface, but parts of it were not functional and I got following error message (logs/catalina.out):
12:19:31,928 ERROR [DashboardDesignerContentGenerator] Could not get component definitions: null
12:19:31,928 ERROR [DashboardDesignerContentGenerator] getcomponentdefinitions: null
java.lang.NullPointerException
at pt.webdetails.cdf.dd.util.Utils.getRelativePath(Utils.java:216)
at pt.webdetails.cdf.dd.util.Utils.getRelativePath(Utils.java:182)
at pt.webdetails.cdf.dd.model.meta.reader.cdexml.fs.XmlFsPluginModelReader.readBaseComponents(XmlFsPluginModelReader.java:228)
at pt.webdetails.cdf.dd.model.meta.reader.cdexml.fs.XmlFsPluginModelReader.read(XmlFsPluginModelReader.java:148)
at pt.webdetails.cdf.dd.model.meta.reader.cdexml.fs.XmlFsPluginModelReader.read(XmlFsPluginModelReader.java:120)
at pt.webdetails.cdf.dd.model.meta.reader.cdexml.fs.XmlFsPluginModelReader.read(XmlFsPluginModelReader.java:43)

I could see the solution repository in PUC and PRD reports were just working fine.
Unfortunately nobody else seemed to have run into this problem, so there was no info available on how to fix this. After several trial and errors I pinned the problem down to the relative solution path I had configured in the web.xml. I just replaced this one with an absolute path and everthing was working fine then in CDE.


I'd like to say special thanks to Paul Stoellberger and Pedro Alves for sharing some of their ideas with me on this particular topic and everyone involved in CBF for their hard work!

Understanding the Pentaho Kettle Dimension Insert/Update Step Null Value Behaviour

$
0
0

We will be using a very simple sample transformation to test the null value behaviour:

We use the Data Grid step to provide some sample data. We specified an id and name column and added data for one record. Let’s run the transformation and take a look at your dimension table in a query client:
Notice that Kettle automatically inserted an additional record with a technical key of value 0. This will only happen in the first execution. Below this record you find the one record from our sample dataset.


You can use the Dimension Lookup/Update step as well to perform only a lookup. Let’s test this. Double click on this step and untickUpdate the dimension?
Add one more data record to the Data Grid and then let’s perform a Preview on the Dimension Lookup/Update step:
Notice how this new record got assigned a technical key of value 0. This is because the id 2 does not exist yet in the dimension table, hence the lookup returned a technical key of 0, the default for unknown values. Remember that every fact record must point to a dimensional record in a Kimball style star schema. The technical key of value 0 is making this possible.


Now let’s test what happens if we have a null value in the natural key in one of our dimension input records. Let’s add one more row to the test dataset:
Notice that we left the id empty for record #3.
Double click on the Dimension Lookup/Update step and enable the update functionality again:
Now run the transformation three times. After this, check the data in your dimensional table:
Hm, the record with the null natural key got inserted 3 times. Not so good!


So let’s quickly delete these records from the dimension table:
DELETE FROM dma.dim_scd2_test WHERE name = 'failure';


Let’s add a filter to our transformation so that these records do not make it to the Dimension Lookup/Update step. The filter checks if the id is not null:
Also create a copy of the Dimension Lookup/Update step. Double click on this copy and disable the update functionality; then connect it directly to the Data Grid step. We will use this copy only for previewing the lookup data.


Ok, now let’s run the transformation again several times and then analyze the data in the dimension table:
As you would have expected, this time we have a clean dimension dataset.


Now, let’s preview the data on the Dimension Lookup/Update step which has the update functionality disabled (so it will only perform a lookup):
Notice that our record with a null natural key got a 0 technical key assigned … just how it should be!


Long story short: Do not insert records with a natural key value of NULL into a dimension table!

Not just Null - handling different nuances


If you have special cases like “Empty”, “Not found” etc, you can manually add these entries to the dimension table (more info).


Let’s consider this for our test dataset. Let’s assume our imaginary client tells us that a natural key of -10000 means that no key is available. We want to track if there was really a -10000 key in the record or if it was null, so what we can do is add an additional record to the dimension manually:


INSERT INTO dma.dim_scd2_test VALUES (-1, 1,'1900-01-01 00:00:00'::timestamp,'2199-12-31 23:59:59'::timestamp,  -10000, 'no key available');


Please note that we set the version, date_from and date_to values as well!


The dimension data looks now like this:
Note: Depending on your DDL, you might not be able to insert a technical key of -1. In this case, just use a positive integer.


Ok, let’s add a new record to our test dataset:
Make sure you change the Filter condition so that it includes the -10000 case:
We don’t want any records with a natural key of -10000 to be inserted into the dimensional table by the Dimension Insert/Update step!


Let’s run the transformation and check the dimension dataset:
All good so far. Now let’s perform a Preview on the Dimension Lookup/Update step which has the update functionality disabled (so it will only perform a lookup):
As you can see, the correct technical keys got assigned.


I do hope that this article gave you a good overview on the null value behaviour of the Kettle Dimension Lookup/Update step. You can find the sample transformation discussed in this article here.

Talend Open Studio For Master Data Management: A Practical Starter Guide 2nd Edition

$
0
0
After several long nights and weekends I finally managed to finish my work on the 2nd edition of the practical starter guide for Talend MDM (open source version). My main aim was to update the existing content so that everything works nicely with the recently released Talend MDM version 5.4 and to improve the structure of the content. I also added two new tutorials to demonstrate the usage of the tMDMTrigger* components.
I'd like to hear your feedback on this small book, so let me know what you think.
You can view/download this small book here.

Pentaho BI-Server 5.0 Community Edition Released

$
0
0
This morning I heard about some exciting news: Pentaho 5.0 CE will be released this Wednesday. I've already been playing around with the development build some weeks ago. The first big difference that you will notice in this release is the new clean web interface, which from my point of view looks a whole lot better than the previous one:


Pentaho User Console and the Admin Console are now finally combined ... no need any more to fire up an extra server to access the admin area!
Pentaho Marketplace really shines in this new release as well ... installing plugins has never been easier!
Under the hood we have a real CMS (Jackrabbit) now - the file-based solution repository is gone (apart from some system files). Content can be uploaded directly via the web-interface or a handy command line utility.
There are many more features, go ahead and check them out here (this link will work as of 2013-11-20). Login details have changed: Joe has retired and is enjoying eternal sunshine on Aruba, your new friend is called admin, and the password is ... you guessed it.
And finally, a big thanks to all the community contributors and Pentaho to make this new release possible!

Expose your Pentaho Kettle transformation as a web service

$
0
0
Did you know that you can expose your Kettle transformation quite easily as a web service? I will quickly walk you through the setup based on a very simple example:


Imagine we are a UK store selling second hand lenses. We store our inventory in a database, prices are in GBP, we want to convert them to USD as well as we have some customers in the US. Furthermore, we want to give the calling app the possibility to retrieve a list from our inventory based on the lens mount.


This is how our transformation looks like (for simplicity and so that you can easily run the transformation on your side I used a fixed sample dataset and a filter to simulate a db input):


We set up our transformation to accept a parameter called VAR_LENS_MOUNT. We retrieve the value of this parameter using the Get Variables set and join it to the main flow. Then we use the Filter rows step to keep only records that match the requested lens mount value. As said, normally we would have a Table input step instead and write a query therefore (but then you cannot run my sample as easily).


The next task is to get the current conversion rate GBP to USD. We use the HTTP Web Service step therefore with following URL:


http://finance.yahoo.com/d/quotes.csv?e=.csv&f=c4l1&s=GBPUSD=X


Thanks to Yahoo we can retrieve this conversion rate for free. We do some post processing to extract and clean the values and finally join them to the main stream. Next we use the Calculator step to calculate the amount of USD based on the conversion rate we just retrieved.


The final step is to set up the Jsonoutput set:


Set the Json output step up like this:
  • Make sure that Nr of rows in a block is left empty so that all rows get output inside one block only.
  • Tick Pass output to servlet.


Click on the Fields tab and then on Get Fields to auto-populate the grid:


Save your transformation.


Next let’s start Carte. Navigate inside your PDI directory and run:


sh carte.sh localhost 8181


This will start Carte on your local machine on port 8181.
To make sure that the server is running properly, go to your favorite web browser:
http://localhost:8181/


Provide the following default username and password: cluster, cluster


Let’s call the web service from your favorite web browser:


You don’t have to copy the ktr to the server, just leave it where it is.


Just run this URL:
http://127.0.0.1:8181/kettle/executeTrans/?trans=%2Fhome%2Fdsteiner%2FDropbox%2Fpentaho%2FExamples%2FPDI%2Fexpose-ktr-as-web-service%2Fsample2.ktr&VAR_LENS_MOUNT=m42


You can see that we specify the full path to our transformation. Make sure you replace forward slashes with: %2F


If you have blanks in your filename, you can just leave them there.


Any parameters are just passed along: Use exactly the same name in the transformation. In this case we only wanted to retrieve a list of m42 mount fit lenses.


Now you can see the json output in your browser:

Other steps that support the Pass output to servlet option are the Text file output and the XML output. In this example we just accessed our transformation directly on the file system from Carte. Alternatively you can configure Carte as well to access the transformation from a repository.

You can download the sample file from here.

For more info have a look at Matt's blog post on the same subject and the Pentaho Wiki (here).

Pentaho Kettle Parameters and Variables: Tips and Tricks

$
0
0

Pentaho Kettle Parameters and Variables: Tips and Tricks

This blog post is not intended to be a formal introduction to using parameters and variables in Pentaho Kettle, but more a practical showcase of possible usages.


Please read my previous blog post Pentaho Data Integration: Scheduling and command line arguments as an introduction on how to pass command line arguments to a Kettle job.


When I mention parameters below, I am always talking about named parameters.

Parameters and Variables

Definitions upfront

Named Parameter: “Named parameters are a system that allows you to parameterize your transformations and jobs.  On top of the variables system that was already in place prior to the introduction in version 3.2, named parameters offer the setting of a description and a default value.  That allows you in turn to list the required parameters for a job or transformation.” (Source)


Variable: “Variables can be used throughout Pentaho Data Integration, including in transformation steps and job entries. You define variables by setting them with the Set Variable step in a transformation or by setting them in the kettle.properties file. [...] The first usage (and only usage in previous Kettle versions) was to set an environment variable. Traditionally, this was accomplished by passing options to the Java Virtual Machine (JVM) with the -D option. The only problem with using environment variables is that the usage is not dynamic and problems arise if you try to use them in a dynamic way.  Changes to the environment variables are visible to all software running on the virtual machine.  [...] Because the scope of an environment variable is too broad, Kettle variables were introduced to provide a way to define variables that are local to the job in which the variable is set. The "Set Variable" step in a transformation allows you to specify in which job you want to set the variable's scope (i.e. parent job, grand-parent job or the root job).” (Source). “

Example

Let’s walk through this very simple example of using parameters and variables. I try to explain all the jobs and transformations involved. The files are also available for download here. You can find the following files in the folder intro_to_parameters_and_variables.

jb_main.kjb

In this extremely simple job we call a subjob call jb_slave.kjb. In this case, we defined hard coded parameter values in the job entry settings. Alternatively, to make this more dynamic, we could have just defined parameters in the job settings.

jb_slave.kjb

This subjob executes the transformations tr_set_variables.ktr and tr_show_param_values.ktr. In this case, in order to access the parameter values from the parent job, we defined the parameters without values in the job settings:
Note: This is just one of the ways you can pass parameters down to the subprocess.

tr_set_variables.ktr

This transformation sets a variable called var1 with scope Valid in parent job so that successive processes can make use if it. In this case the values originate from a Generate Rows step for demonstration purposes; in real world examples you might read in some values from a file or a database table.

tr_show_param_values.ktr

The main transformation has the sole purpose of writing all the parameter and variable values to the log. We retrieve the parameters and variable by using a Get Variables step. We also check if a value is present by using a Filter Rows step. In case one value is missing, we Abort the transformation, otherwise the values are written to the log.


There is no need to set the parameter names in this transformations; there is an advantage though if you do it:
Missing parameter values will be properly displayed as NULL, which makes it a bit easier to check for them.
If you don't define them in the transformation settings, missing parameter values will be displayed as ${PARAMETERNAME}.


Important: Variables coming from tr_set_variables.ktr MUST NOT be listed in the Parameter tab in the Transformation Settings as this overrides the variable.

Making Parameters available for all subprocesses in an easy fashion

As you saw above, defining the parameters for each subprocess just to be able to pass them down can be a bit labour intensive. Luckily, there is a faster way of doing just this:


  1. In the main job specify the parameters that you want to pass in in the Job Settings:
    This way parameters and their values can be passed in from the command line in example.
  2. Right after the Start job entry use the Set Variables job entry. Specify the variable names, reference the parameters you set up in step 1 and set the scope to Valid in the current job.
  3. There is no need to specify any parameters/variables in any of the subprocesses.


To see how this is working, run jb_main.kjb in the passing_down_parameters_in_an_easy_fashion folder (part of the provided examples).

What if I still want to be able to run my subprocess independently sometimes?

You might have some situations, when you have to run the subprocess independently (so in other words: You do not execute it from the parent/main job, but run it on its own). When we pass down parameters or variables, this can be a bit tricky and usually it just doesn’t work out of the box. Luckily, there is a way to achieve this though:
  1. In the subprocess, specify the parameter that you want to be able to pass in. In our example (which is based on the previous example), we modified the transformation tr_show_param_values.ktr and added following parameters to the Transformation Settings:
    We also amended the
    Get Variables step to make use of these parameters:
    This way, we can already run this transformation on its own. Now we only have to adjust the parent job so that we can run it from there as well.
  2. In the parent job, in the Job or Transformation job entry settings, go to the Parameters tab and tick Pass all parameter values down to the sub-transformation/sub-job. Next, as the Parameter set the name of the parameter you defined in the subprocess. As the Value define the variable that you want to pass down: ${variable}. This assumes that this variable was set beforehand by some Set Variables job entry/step.
    In our case, we modified transformation job entry in the job
    jb_slave.kjb and added following mapping to the job entry settings in the Parameters tab:
A sample for this setup is provided in the mulitpurpose_setup_allow_individual_execution_of_subprocesses folder.

Closing remarks


Using parameters and variables in Kettle jobs and transformations allows you to create highly dynamic processes. I hope this tutorial shed some light onto how this can be achieved.


Going Agile: Test your Pentaho ETL transformations and jobs with DBFit and ETLFit

$
0
0

Going Agile: ETLFit (Testing)

This article is part of the Going Agile series of articles.


Articles published so far:


A very big thanks to etlaholic** for writing a PDI fixture for FitNesse (find original announcement here as well as a quick starter guide here)! As you can find out on the git page, the developer was very much inspired by Ken Collier’s book Agile Analytics (see my review here - once again, a book I highly recommend).


Unfortunately, I couldn’t hear enough people applauding the developer for this effort, so let me use this opportunity here to say: Well done and thanks a lot!


Unfortunately, topics such as testing do not earn much attention … when they really should.


Having said this, let’s learn a bit more about it.


**[@etlaholic: It would be great if you could mention your real name on your blog. You have some excellent post there of which you can be very proud of!]

Initial Setup

I just briefly talk you through this:


Project webpage:


mkdir etlfit
cd etlfit
git clone git@github.com:falling-down/etlfit.git


Download dependencies
DBFit (http://benilovj.github.io/dbfit/): just click the download button


mkdir dbfit
cd dbfit
mv ~/Downloads/dbfit-complete-2.0.0.zip .
unzip dbfit-complete-2.0.0.zip


Adjust dbfit path in etlfit build.sh
cd ../etlfit
vi build.sh


Change
_HOME=~/
to
_HOME=../


This is not quite ideal, but I didn’t want to store the dependency files in my home directory.


It’s time to build ETLFit now:
sh ./build.sh


Next create the jar:


cd classes
jar -cvf etlfit.jar etlfit


Copy the resulting jar file to the lib directory of DbFit:
cp etlfit.jar  ../../dbfit/lib


You can copy the provided EtlFit subwiki to your FitNesseRoot directory.
cd ..
cp -r test/EtlFit ../dbfit/FitNesseRoot/


Now start the Fitnesse Server (More details here):
cd ../dbfit
sh ./startFitnesse.sh


Then check out the ETLFit example in your favourite web browser:


Read the content of this page properly!

Create your first test (very simple)

Read this page:


So let’s create a very basic test (without a Kettle job or transformation):


Just type in the base URL followed by a slash and the the filename in CamelCase:


This will directly open in the editor:


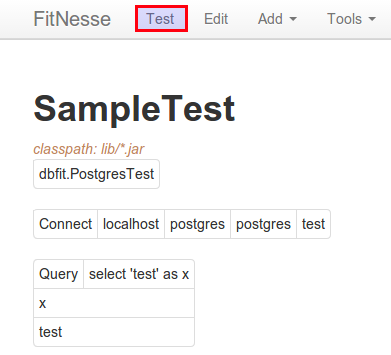
Insert the following lines into the editor window:


!path lib/*.jar
!|dbfit.PostgresTest|
!|Connect|localhost|postgres|postgres|test|
!|Query| select 'test' as x|
|x|
|test|


The wiki lines above do the following (explanation line by line):
Load DBFit extension into FitNesse
Define database type
Define connection details
Define test query
Define result set columns that you want to use (you can cherry pick here)
Define the expected results


Please note that you have to adjust the database type and connection details according to your setup.


Once you save this it will look like this:
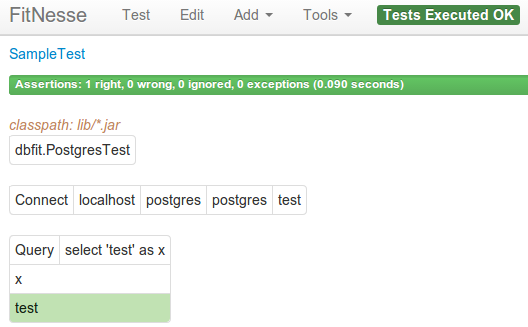
Then click Test in the top page menu bar and the test will be executed:
Test results are nicely presented on this page.


Another nice thing here is that the PostgreSQL driver is already installed, no additional setup and configuration necessary.

Putting it all together: Test with FitNesse and ETLFit


Let’s get a bit organized and set up a subwiki page:


Just leave the default content in the editor and then click Save.
The main wiki page (FrontPage) cannot be edited directly via the web browser, so open the following file:
export ETLFIT_HOME=/opt/pentaho/etlfit
vi $ETLFIT_HOME/dbfit/FitNesseRoot/FrontPage/content.txt


Note: Adjust the path to ETLFIT_HOME according to your setup.


Add:
!4 Subwikis
* .DbFit
* .MyProject


just before !-</div>-!


In your favourite web browser, navigate to http://localhost:8085.
You should now see the links to the sub-wiki:
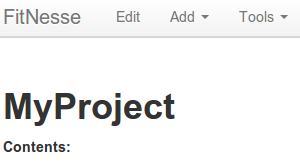
Click on the .MyProject link now and you will be presented with a fairly empty page:
Next we have to let FitNesse know where to find the code to run the ETLFit fixtures. Click on Edit and this at the top (do not replace the default content):
!path lib/*.jar


Click Save next.


Next we will add the connection details and Kettle parameters to a dedicated Setup Page, which you can access via this URL:


localhost:8085/MyProject.SetUp


Config details stored in the SetUp page will be available to all pages in your subwiki.


# SetUp
!|dbfit.PostgresTest|
!|connect|localhost:5432|postgres|postgres|test|


!|etlfit.RunKettleFixture|
| set java home | /usr/lib/jvm/jdk1.7.0_15 |
| set kettle directory | /opt/pentaho/pdi/pdi-ce-5.0.1-stable/ |
| set etl directory | /home/dsteiner/Dropbox/pentaho/Examples/PDI/etlfit/ |


Please note that you have to adjust the configuration details according to your setup.


Make sure you add the trailing slashes to the last two parameters. There are more parameters available, this is just a starting point.


Save the page.


If you want to add a test page now, you can simple do this via the main menu: Add > Test Page:
Provide a name for the test page. It is a good practice to suffix your test pages with Test and your test suite pages with Suite.


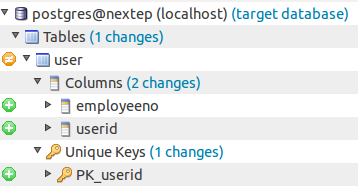
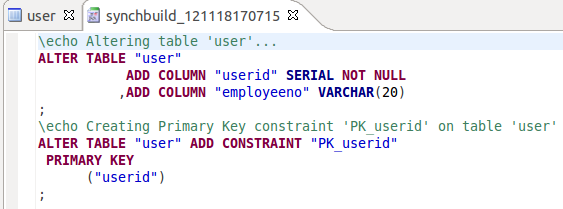
Now define the test details. First we clear the way (not really necessary), then we create the source and target tables. Next we insert the source dataset, then we execute the query with all required parameters and finally we define the result dataset query and what we expect as result dataset. In the end we drop all the tables again to keep everything tidy and rerunable.  


### The set up
# create tables
!| execute | drop table if exists test.test4 |
!| execute | drop table if exists test.test5 |
!| execute | create table test.test4 ( city varchar(20), amount int ) |
!| execute | create table test.test5 ( city varchar(20), amount int, a char(1), b char(1) ) |


# insert rows
!| insert | test.test4 |
| city | amount |
| london | 30 |
| new york | 25 |
| miami | 45 |
# Remember to commit so that the transformation can act on the data.
!|commit|


### The execution
# Remember to declare the fixture name because DbFit is controlling the page.
!| etlfit.RunKettleFixture |
| run transformation | tr_test | with | !-
VAR_A=a,
VAR_B=b -! |
# Tip: If your transformation has many parameters you can use the !- -!
# enclosure to list them on multiple lines.
# This will help the readability of your test.


### The evaluation
!| query | select * from test.test5 |
| city | amount | a | b |
| london | 30 | a | b |
| new york | 25 | a | b |
| miami | 45 | a | b |


### The tear down
# Put your environment back the way you found it.
!| execute | drop table test.test4 |
!| execute | drop table test.test5 |


Save this now.


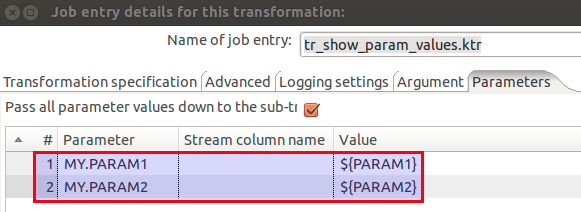
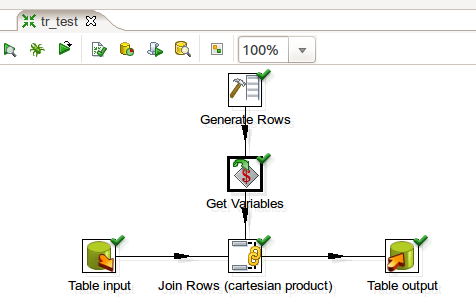
I created this very simple (and not very useful) transformation which accepts two parameters called VAR_A and VAR_B:


Let’s run the test now: Still on the http://localhost:8085/MyProject.SampleTest page click on Test:
On the following page you will see an indicator that the test is running and once completed, you will be presented with the results:
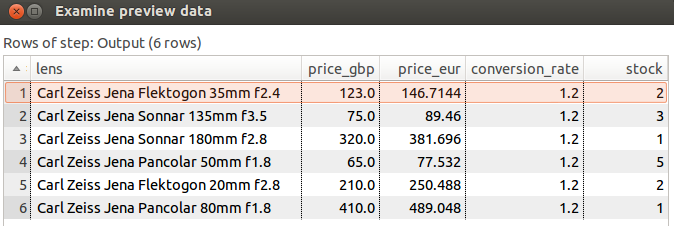
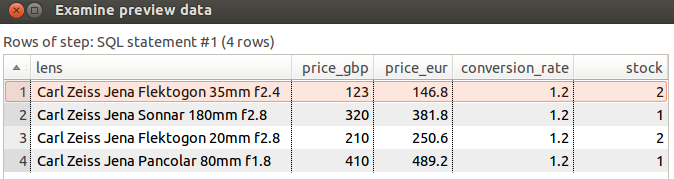
More further down the page you can see which rows in the resultset were valid:
So you completed your first test setup and saw the results … quite impressive, isn’t it? This was of course just a simple example, go ahead and explore some of the other options. More useful tips and tricks can be found on etlaholic’s excellent Starter Guide.

Final words

Using a Wiki page as a means of setting up a test is certainly a very interesting approach which makes the whole topic quite accessible to not so technical minded/skilled people as well. I do hope that ETLFit as well as DBFit gain some more momentum and support. DBFit currently doesn’t support many databases, so you might not be lucky enough to use it on every project you work on. But let’s hope that this changes in future! All in all, make sure you start using some sort of automated testing as soon as possible - I know it is a bit of a learning curve and it will take a bit of time, but once you start using ETLFit/DBFit in example, you won’t look back!

Database Version Control: Sooner than later! (NeXtep)

$
0
0
Working in business intelligence usually involves creating schemas for at least the data warehouse and data marts. Usually the DDL is written using a text editor or some kind of GUI, svn or git or similar is used as standard version control, but effective versioning of this ddl is quite often not happening. Why do I say “effective” versioning - well in the case of database development you will need a tool that can generate the DDL for the delta of two versions, so that you can easily upgrade your databases.
If you are working in a project which involves properly set up development, testing and production environments, database version control should be mandatory. The good news is that there are actually some open source tools out there which can help you with that. The bad news is, that none of them can be considered in active development and none of them probably found the recognition and widespread usage that their original developers set out for.
About a year ago I tried to find some open source projects for database version control, the two tools I could find at that time were dbmaintain and neXtep. Judging by their release history one might think that these projects are dormant. So I kind of gave up on this topic. This year then at the Pentaho User Meeting in Amsterdam Edwin Weber actually mentioned neXtep in his presentation and I had a brief conversation with him afterwards about his experience with this particular tool. He mentioned that although there were no new releases, there were still patches submitted for that tool. So I kind of thought, let’s give this a try. I finally came around to take a look at neXtep just a week ago.
After registering you can download the neXtep Studio, which is Eclipse based. Setting it up is fairly straightforward and the interface is fairly intuitive as well. What I was not expecting is that the documentation was that good. It seems like the people behind this project spent really a considerable amount of time in creating what I would call an excellent documentation, which you can find here.
There is also a forum where I even got some answers to my questions! If someone fancies adding support for additional databases, some documentation can be found here and here.
The aim of this post is not to walk you through the tool, as their Wiki really is the best place to find that insight, it is just a way of saying: “Hey, there is this impressive tool out there for database version control, start using it and give them some support!”.
I think, that, although it is very often neglected, database version control is a very important topic. Version your database sooner than later!

Some notes on the installation:
I had some problems with setting up the neXtep repository on

  • PostgreSQL 9.2: Two columns could not be created. Seehere on how to solve this problem.
  • MySQL 5.5: The installer started hanging when performing the final upgrade of the repository. I just killed the process and started neXtep Studio again after which it successfully upgraded the repository. I couldn’t create any user then, but luckily (in this case) the password is stored as plain text in the db table. Run:
    SELECT * FROM nextep_repo.REP_USERS;


How to use neXtep’s database version control

This is an extremely simplified setup: Let’s imagine we already have one table in our PostgreSQL database (users with MySQL, MS SQL or Oracle databases please adjust the SQL respectively):

CREATE DATABASE nextep;
\connect nextep
CREATE SCHEMA test;
CREATE TABLE
test.user
(
firstname VARCHAR(50)
, lastname VARCHAR(50)
)
;

We decide to start with database version control, because things are going to get much more complex pretty soon once the project starts rolling.
On the terminal (in my case on Ubuntu) navigate to the neXtep install directory and start the Studio (this takes into account that you have already set up the neXtep repository and users):

./neXtep

When the Shared Workspace selection dialog comes up, choose New Workspace. Then provide a name, description and select PostgreSQL as database vendor. Make sure you then select Import structure from an existing database (reverse engineering):

Now provide all the database connection details and test the connection:

Click Next. You will be asked to for the DB password again (make sure you tick to save it this time).
Now pay special attention to the Version Navigator on the left hand side of the Studio:

Right click on the module, the second element in the hierarchy, Nextep Test, and choose commit:

In this case we will not change the version number (but we will do so in future). Add a good description and then click commit. Now you will see that module as well as the table name have a lock symbol attached.

Next mark the table name and click on the Check Out button (or alternatively right click on the table name and choose Check Out):

A new dialog comes up, called Problem Solver Wizard, just click Finish. Next provide a good description of the changes you are about to make. You will see that neXtep automatically increase the patch number, which is just what we want in this case. We also want to work on the main branch:

Click Ok.
Notice that the lock symbols disappeared in the Version Navigator and that the version number increased.

In the Version Navigator double click on the user table. You will now see a new Table Overview coming up. Let’s now add a new column called user_id. Click on the Columns tab at the bottom of the Table Overview, then click on Add:


Add following columns:

  • userid: SERIAL
  • employeeno: VARCHAR(20); description: alpanumeric code
Next move the userid column up so that it is the first column in the table.

Click on the Primary Keys tab and a new primary key called PK_userid and assign the userid column:

We also want to pay attention on the error message neXtep brought up: We forgot to define the userid column as NOT NULL, so we go right back to the Columns tab and change the userid accordingly:

As we have implemented all the required changes, we are ready to commit them. Click on the Commit and lock this version button. You have now one more time the chance to adjust the description, then click commit.
Note that the version number increased again:

Then click on the Synchronize DB button:

This opens the Synchronization perspective.
The Synchronization pane gives you an exact overview of the changed since the last applied version:

It highlights that we added the employeeno and userid columns as well as a primary key called PK_userid.
In the main work area you can see the DDL neXtep generated to upgrade our target database from version 1.0.0.0 to 1.0.0.1:

As this looks all quite fine for us, we click on the Execute button:

And all these changes will be applied to our target database. Watch the Console view for any progress messages.

It’s always good practice to click the Synchronize button again just to make sure that our model matches the DB model. As we can see in our case, something is not quite alright:

What basically happened is that PostgreSQL created its own sequence for the userid and also changed the data type to Integer. This is fine for us, so we can just incorporate these changes. Click on the Repository reverse synchronization from database information button and then click Execute:

Now we want to ensure that everything is properly in sync again, so we click the Synchronize database button again. Now everything is fine (click the Shows/Hides unchanged items button as well):

Go back to the Database Design perspective and have a look if the changes were applied. We can see that a new sequence was added (in the Version Navigator)

and that the userid column details changed:

To be fair, we could have set it up like this in the first place, but now at least you got a bit more exposed to the synchronization options.

How to create a branch

This is now our first release, which will be delivered to the test environment. Let’s create a new branch test to commit these changes there:
Click on the module Nextep Test and choose Commit. Provide an activity description and click on Iteration. Then click on new and create a Test branch:

Click Next followed by Finish.

Note that the version tree gets automatically updated:


We could now package and deliver this model (available via a right click action on the module name). neXtep also supplies a command line tool called neXtep Installer (more info here) which is able to deploy database deliveries generated by the neXtep Studio.

How to merge

Obviously we also want to have all these improvements in the main branch, so we can use the merge action. First we have to go back to the last version of the MAIN trunk. We do this by creating a new workspace.

Choose Workspace > Create new workspace and make sure you select the Explicitly define the versions of the modules option.

In the View rules definition wizard choose the latest version of the main trunk and click Add module to view:


Click Finish.

As you can see in the Version Navigator our new workspace is based on the latest main trunk version:


If you now click on Workspace > Change Workspace you will see that you can now switch between the main and test trunk versions by switching between these two workspaces (ok, we should have named it in a better fashion):


Workspace: Versions are not bound to a particular workspace. A workspace is just a space where you define the set of elements you need to work on, and you can create as many workspaces as you need. [source: neXtep site]

Click on Cancel.

Now we want to merge the latest version of the Test branch with this one, so that we have all the changes over here for a good base to add future developments:

Right click on the module Nextep Test and choose Merge to ..., which brings up the Merge Wizard. Click on the latest version of the Test branch in the diagram:

Click Next and you will see a graphical representation of the changes you requested:

Now you will see a detailed overview of the merge results (note that the screenshot might not 100% match with yours because I added a few other things, but you get the idea):


Click Ok.

Summary

We walked through various scenarios that you might come across in your daily work with database versioning - like creating dedicated branches, merging branches. As you have seen neXtep Studio is an extremely promising open source product! Database versioning is extremely important, so start today with it! You will not look back!

Mondrian 4: Get ready!

$
0
0

Mondrian 4: Get ready!

Mondrian is a very popular open source analytical engine which is used in various offerings (like Pentaho BA Server, JasperSoft BI Server). Mondrian 4 brings a whole bunch of new features, some of which we will discuss in this blog post.

Prerequisite


  • You are familiar with XML
  • You are familiar with OLAP
  • You are familiar with the command line on a Linux OS or Mac OS.
  • Download Eclipse IDE for Java EE Developers from here. Users unfamiliar with Java, don’t worry, we won’t write a single line of Java! We will use Eclipse only to create an OLAP schema.
  • Download the Mondrian 4 version of Saiku from here. We will use it to test the schema. Please note that this branch is in active development and not suitable for production use! If you need a version for production use (currently without Mondrian 4 support), download it from the main website.
  • This post is not really a step by step tutorial, more a kind of general overview, so it is recommended that you have a data set (ideally a data mart) so that you can follow along and create your own OLAP schema.
  • All my files related to this post can be download here.

What’s new

  • Dimensions are now loosely set up using Attributes. The can be part of a hierarchy but they don’t have to. If defined in a hierarchy, they can still be used on their own.
  • MeasureGroups can be used to define Measures from more than one fact table (that have the same dimensionality and granularity).
    • There are no aggregated patterns any more, use MeasureGroups for defining aggregates.
    • Virtual Cubes are depreciated
  • Schema Workbench is discontinued. Write the OLAP Schema in a text/XML editor of your choice
  • No XMLA server, spin off project OLAP4J xmla server
  • Built-in time dimension generator

A quick overview of the new syntax

We will quickly have a high level overview of the new syntax. I highly recommend obtaining the forthcoming bookMondrian In Action for more detailed instructions. Also, if you don’t know the purpose of an XML element or attribute, you can find a description in theMondrian API documentation.

High level structure

Please find below a simplified structural overview of the OLAP schema definition:

<?xml version="1.0" encoding="UTF-8"?>
<!DOCTYPE Schema SYSTEM "mondrian.dtd">
<Schema metamodelVersion="4.0">
<!-- Define how the DB tables are set up -->
<PhysicalSchema>
<!-- Specify source tables -->
<Table/>
<!-- Define relationships between snowflake or alias tables, not direct dim tables! -->
<Link/>
</PhysicalSchema>
<!-- Create your cube definition and reference back to the physical schema -->
<Cube>
<!-- Define dimensions and attributes -->
<Dimensions>
<Dimension>
<Attribute/>
</Dimension>
<Hierarchies>
<Hierarchy>
<Level/>
</Hierarchy>
</Hierarchies>
</Dimensions>
<!-- Define Measures -->
<MeasureGroups>
<MeasureGroup>
<Measures>
<Measure/>
</Measures>
<DimensionLinks>
<ForeignKeyLink/>
<FactLink/>
</DimensionLinks>
</MeasureGroup>
</MeasureGroups>
<!-- Define Calculated Members and Names Sets -->
<CalculatedMembers/>
<NamedSets/>
</Cube>
<!-- If you have conformed dimensions, specify them globally.-->
<Dimension>
<!-- Define roles below to restrict access to the cube(s). -->
<Role>
</Schema>

Note that Mondrian 4 is not sensitive to the order you mention these building blocks, so you can mention the cube before the physical schema in example.

How to define the physical schema

The physical schema defines how your database tables are set up:
<PhysicalSchema>
      <Table name='employee'>
          <Key>
              <Column name='employee_id'/>
          </Key>
      </Table>
      <Table name='store'>
          <Key>
              <Column name='store_id'/>
          </Key>
      </Table>
      <Link source='store' target='employee'>
          <ForeignKey>
              <Column name='store_id'/>
          </ForeignKey>
      </Link>
</PhysicalSchema>
Note: The <Link> element is only used to describe the relationship to alias tables or snowflaked tables (so tables that are more than one link away from the fact table).

How to define dimensions

Dimensions are defined with the <Dimension> element and their members with the <Attribute> element. Mondrian will by default create a hierarchy for every attribute you create unless you specify <Attribute hasHierarchy=”false”>. There is an optional <Hiearchy> element for specifying multi-level hierarchies.

          <Dimension name='Promotion' table='promotion' key='Promotion Id'>
              <Attributes>
                  <Attribute name='Promotion Id' keyColumn='promotion_id' hasHierarchy='false'/>
                  <Attribute name='Promotion Name' keyColumn='promotion_name' hasHierarchy='false'/>
                  <Attribute name='Media Type' keyColumn='media_type' hierarchyAllMemberName='All Media' hasHierarchy='false'/>
              </Attributes>
              <Hierarchies>
                  <Hierarchy name='Media Type' allMemberName='All Media'>
                      <Level attribute='Media Type'/>
                  </Hierarchy>
                  <Hierarchy name='Promotions' allMemberName='All Promotions'>
                      <Level attribute='Promotion Name'/>
                  </Hierarchy>
              </Hierarchies>
          </Dimension>


One of the big advantages of Mondrian 4 is that you can now use attribute on their own as well even if they are part of a mulitlevel hierarchy!

How to define measures

Measures are defined with a <MeasureGroup> element. Within the <DimensionLinks> element you can define the foreign keys for all the dimensions that are related to this MeasureGroup:
<MeasureGroups>
          <MeasureGroup name='Sales' table='sales_fact_1997'>
              <Measures>
                  <Measure name='Unit Sales' column='unit_sales' aggregator='sum' formatString='Standard'/>
                  <Measure name='Store Cost' column='store_cost' aggregator='sum' formatString='#,###.00'/>
                  <Measure name='Store Sales' column='store_sales' aggregator='sum' formatString='#,###.00'/>
                  <Measure name='Sales Count' column='product_id' aggregator='count' formatString='#,###'/>
                  <Measure name='Customer Count' column='customer_id' aggregator='distinct-count' formatString='#,###'/>
                  <Measure name='Promotion Sales' column='promotion_sales' aggregator='sum' formatString='#,###.00' datatype='Numeric'/>
              </Measures>
              <DimensionLinks>
                  <ForeignKeyLink dimension='Store' foreignKeyColumn='store_id'/>
                  <ForeignKeyLink dimension='Time' foreignKeyColumn='time_id'/>
                  <ForeignKeyLink dimension='Product' foreignKeyColumn='product_id'/>
                  <ForeignKeyLink dimension='Promotion' foreignKeyColumn='promotion_id'/>
                  <ForeignKeyLink dimension='Customer' foreignKeyColumn='customer_id'/>
              </DimensionLinks>
          </MeasureGroup>
</MeasureGroups>

How to define aggregated tables

In previous versions configuring aggregated tables was an area of confusion for many users. Thankfully this has been massively simplified with the arrival of Mondrian 4. Now aggregated tables can be directly referenced in the OLAP schema inside the <PhysicalSchema> and properly defined inside the <MeasureGroup> element.

<PhysicalSchema>

<Table name='agg_c_special_sales_fact_1997'/>
<Table name='agg_pl_01_sales_fact_1997'/>
<Table name='agg_l_05_sales_fact_1997'/>
<Table name='agg_g_ms_pcat_sales_fact_1997'/>
<Table name='agg_c_14_sales_fact_1997'/>
</PhysicalSchema>

<MeasureGroups>
 …
          <MeasureGroup table='agg_c_special_sales_fact_1997' type='aggregate'>
              <Measures>
                  <MeasureRef name='Fact Count' aggColumn='fact_count'/>
                  <MeasureRef name='Unit Sales' aggColumn='unit_sales_sum'/>
                  <MeasureRef name='Store Cost' aggColumn='store_cost_sum'/>
                  <MeasureRef name='Store Sales' aggColumn='store_sales_sum'/>
              </Measures>
              <DimensionLinks>
                  <ForeignKeyLink dimension='Store' foreignKeyColumn='store_id'/>
                  <ForeignKeyLink dimension='Product' foreignKeyColumn='product_id'/>
                  <ForeignKeyLink dimension='Promotion' foreignKeyColumn='promotion_id'/>
                  <ForeignKeyLink dimension='Customer' foreignKeyColumn='customer_id'/>
                  <CopyLink dimension='Time' attribute='Month'>
                      <Column aggColumn='time_year' table='time_by_day' name='the_year'/>
                      <Column aggColumn='time_quarter' table='time_by_day' name='quarter'/>
                      <Column aggColumn='time_month' table='time_by_day' name='month_of_year'/>
                  </CopyLink>
              </DimensionLinks>
          </MeasureGroup>
</MeasureGroups>

Creating an OLAP Schema in Eclipse

You can create the Mondrian OLAP Schema in any text editor, XML editor or IDE. Eclipse is quite a popular IDE and will serve as an example here.

I created an XSD based on the DTD file found in the Mondrian lib folder (Link to original Mondrian 4 DTD) to be able to validate the XML file (the actual OLAP Schema). Currently this DTD is not suitable for validating the OLAP schema XML document (Julian pointed at that he added multiple inheritance to the schema. He created this JIRA case to address this). So, what I basically did, and this was a very quick fix, is to run the DTD through a converted that outputs an XSD and then I quickly fixed the few problems I encountered. I tested this XSD against one of my XML files and against the Foodmart one which worked fine. I am sure that this schema (XSD) needs some more work, so please report back to me any problems that you encounter using the comment function on this post.

Download my Mondrian XSD version mondria4.xsdhere.

Please don’t get confused: The XSD (short for XML Schema Definition) is a file which defines the structure of an XML document. XSD is a successor of DTD (Document Type Definition) and is way more powerful. The XML document (which we will create based on this XSD) in our case happens to be called the Mondrian OLAP Schema (I will try to mostly call it XML file).
Open Eclipse and create a new Project (not a Java Project) called Mondrian4Schema. Place the XSD file directly in the project folder.
The easiest way to create the XML file is to right click on the XSD file and choose Generate > XML File:


Next specify the Root element, which in our case is Schema:


A basic XML structure will be created for you. People familiar with XML will probably want to jump directly to the source view and start working there.

For people not so familiar with XML, you can use the Outline panel to add elements and attributes by simply right clicking on a node:


And before you upload the xml file to the server, you should validate it. Right click on the xml file and choose Validate:


Note: This validation only checks if your XML file matches the structure define in the XSD file. So it doesn’t check if you referenced the correct tables, if the relationships are correct etc. We can call this our first check. The second check will be to understand if the xml file is logically correct - this will be done by running it on Mondrian (i.e. via Saiku) and analyzing the error messages (if there are any). The third check is then to see if the data is correct / dimensions and measures behave as expected - test this via a graphical interface like Saiku.

Using an XML Template in Eclipse

To make your life even easier, start your OLAP schema based on a template. I created a template which you can download here and use for the following steps. You can also create your own one.

Note that the sample template expects the XSD file to be in the same folder as the xml file you create. You can easily avoid this dependency by pointing to a public XSD.

Copy the content of the template file.

Go to Preferences  and select XML > XML Files > Editor > Templates and then click New:


Provide a Name and Description. Set the Context to New XML and paste the content of our template into Pattern:


Click Finish.

Now, when you create a new XML File, you can choose Create XML file from an XML template:


And then you can choose the template we set up earlier:


Using a template should save you quite some time and users unfamiliar with Mondrian schemas will have an easier entry point.

How to upload the OLAP Schema to the BI Server

Schema Workbench had the quite useful option to upload the XML file to the BI Server. There are plenty of alternatives now … you might as well use Filezilla or a similar FTP client to upload the file to a remote server. Later on I will show you how you can export your XML file directly from Eclipse to your local webserver.

Testing Mondrian 4 Schema with Saiku locally


Setting up Saiku

Current download location of the Mondrian 4 version (2013-01-14):
http://ci.analytical-labs.com/job/saiku-mondrian4/

If you have the Pentaho BI Server installed, then you can just download the plugin. Otherwise if you want to have the standalone version, download Saiku Server.

Instruction below are for the standalone Saiku Server:
If you are not familiar with the Saiku Server, then readthis short introduction.

I extracted the files in my home folder. Let’s get ready and start the server:

cd ~/saiku-server
chmod -R 700 *.sh
sh ./start-saiku.sh

Wait a minute or so until the server is ready, then check if you can access it in your browser:

http://localhost:8080
username: admin
password: admin

If you can access the web interface, carry on with the following steps:

Export the Mondrian XML file to your local test server

We could have created a Dynamic Web Project in Eclipse as well and deployed it on the server, but this is probably a bit too ambitious. It is very simple to export to xml file to the server from our Eclipse project.

First let’s create a folder on the server. There is currently a folder set up for all the Saiku demo files - we will be using this one for simplicity sake:
cd ~/saiku-server/tomcat/webapps/saiku
mkdir supplierChain

In Eclipse, right click on the Mondrian xml file, choose Export:

Next choose General > File System and click Next:

Define which file from which project you want to export and define the destination folder:

And click Finish. Now you have a copy of your file on your local server.

Configuring Saiku

Configure the data source as describedhere.
If necessary, add a JDBC driver as describedhere.
In my case, this burns down to the following (as an example my DB tables reside on my local MySQL DB and I created a Mondrian schema called supplierChain.mondrian.xml):

cd ~/saiku-server/tomcat/webapps/saiku/WEB-INF/classes/saiku-datasources
cp foodmart supplierChain
vi supplierChain

Change the content of the file to:

type=OLAP
name=supplierChain
driver=mondrian.olap4j.MondrianOlap4jDriver
location=jdbc:mondrian:Jdbc=jdbc:mysql://localhost/datamart_demo;Catalog=../webapps/saiku/supplierChain/supplierChain.mondrian.xml;JdbcDrivers=com.mysql.jdbc.Driver;
username=root
password=

Save and close.

Note: In my download the Saiku Server had already the MySQL JDBC jar included, so the next section is just an overview in case you need to add any other driver

Next download the JDBC MySQL driver fromhere.

cd ~/saiku-server/tomcat/webapps/saiku/WEB-INF/lib/
cp ~/Downloads/mysql-connector-java-5.1.22/mysql-connector-java-5.1.18-bin.jar .

Nice and easy.

Restart Saiku and check if you can see the schema now in the web interface:

If you encounter problems, have a look at the server log:
vi ~/saiku-server/tomcat/logs/catalina.out
Go straight to the end of the file by pressing SHIFT+G and then start scrolling up and keep looking out for human readable error messages. Note at new users: There will be a lot of cryptic lines … just ignore them … at some point you should find something meaningful (if there is an error).
Or if you want to keep watching the log:
tail -f ~/saiku-server/tomcat/logs/catalina.out
In case there are problems with your OLAP schema, you should find some hints there.

Example of which errors you can find via reading the weblog: My new OLAP schema was not showing up in the web interface, so I analyzed the log and found the following line:

As you can see, it says here “Table 'dim_customers' does not exist in database. (in Table) (at line 27, column 4)”, which means the table name I specified in the XML file must be wrong. Doing a double check I realised, the table is actually named dim_customer. So I go back to Eclipse, correct this mistake, reupload the file and refresh the cache again … now my Schema is showing up.


If you make changes to the Schema and export it to the server again, you can simply refresh the Saiku server cash by clicking the Refresh button in the web interface:

Now we can do the last part of our checks: Analyzing if the dimensions and measures behave as intended and as we are already on the way, we also check if the data is correct. We do all this by just playing around with the dimensions and measures in the GUI and also run some SQL queries to cross check results:

How to enable Mondrian MDX and SQL logging on Saiku

In some testing scenarios you might be interested in the SQL that Mondrian generates. To enable this kind of logging, edit the log4j.xml file in
~saiku-server/tomcat/webapps/saiku/WEB-INF/classes

Uncomment the very last section just below the title Special Log File specifically for Mondrian SQL Statements. If you want to log the MDX statements as well that gets submitted, uncomment the section above (Special Log File specifically for Mondrian MDX Statements).Save the file.

Restart the server then.

You will then find two new log files in ~/saiku-server/tomcat/logs:
mondrian_sql.log
mondrian_mdx.log

In example, if you use the fancy MDX mode functionality on Saiku which allows you to write and execute your own MDX queries, you can just follow the SQL which gets generated by Mondrian by running this command in your terminal:
tail -f ~saiku-server/tomcat/logs/mondrian_sql.log

BIRT: Creating and using external style sheets

$
0
0

BIRT: Using the global library for styles, images etc

BIRT libraries allow you to share themes (styles), images etc among many reports. I consider using the library a must for any project that involves more than one report and that share common styles etc simply because it makes my life a lot easier: If somebody requests a style change i.e., there is just one place where I have to change the style, not hundreds of reports!
Reference style from the library
  1. First create the styles in the project library: Click on the Navigator tab, choose your project, and if there isn’t already a library file available, create one by right clicking on the project name and choosing New >Library.
  2. With the library file open, switch to the Outline tab, right click on Themes and choose New * Theme. You can create as many themes there as you want. A theme is a collection of styles. Note that you can create both chart and standard report themes here. You can also copy the themes here from existing reports. Also note that you can import CSS styles from an existing file.
  3. To add styles to a standard theme, right click on your Theme and choose New Style.
  4. To use this global library, open your report, right click on Libraries in the Outline view and choose Use Library:
    Choose the library that you want to reference.
  5. Chart Themes are available already when you configure a chart. But for the standard theme we have to take an additional step: In the Outline view select the report root element and then choose in the Properties view under General> Themes the theme you want to use:
  6. Now if you select one of the report elements and go the the style property, you will see styles listed from the external library.
  7. If you make changes to the external library, right click the root element in your report in the Outline tab and choose Refresh Library:
Referencing an image from the global library
Usually you can just drag and drop an image from the Resource Explorer to your report. You will also release that in the Outline view the referenced image will be added to the Embedded Images - note the additional link symbol on the icon next to the image name:


Sometimes this doesn’t seem to work though, in example I experienced problems placing the library image in a grid. The workaround in this situation is to drag and drop the image from the Resource Explorer view to the Outline view into the Embedded Images folder:


Next drag and drop the image from the Outline view to your report.

Creating a federated data service with Pentaho Kettle

$
0
0

Creating a federated data service with Pentaho Kettle

Prerequisite


  • Kettle (PDI) 5: download here [Not for production use]
  • You are familiar with Pentaho Kettle (PDI)
  • You are familiar with the Linux command line

What is the goal?

We have data sitting around in various disparate databases, files, etc. By creating a simple Kettle transformation which joins all these data together, we can provide a data service to various applications via a JDBC connection. This way, the application does not have to implement any logic on how to deal with all these disparate data sources, but instead only connect to the one Kettle data source. These applications can send standard SQL statements to our data service (with some restrictions), which in turn will retrieve the data from all the various disconnected data sources, join them together and return a result set.
This Kettle feature is fairly new and still in development, but it holds a lot of potential.

Configure the Kettle transformation

I created a very simple transformation which gets some stock data about lenses with prices in GBP (For simplicity sake I use a Data Grid step. In real world scenarios this would be a Database Input step). We get the current conversion rate from a web service and use this rate to convert our GBP prices to EUR. The transformation looks like this:


You can download the transformation from here.

Note the yellow database icon on the top right hand corner of the Output (Select Values) step. This indicates that this step is used as Service step. This can be configured in the Transformation Properties by pressing CTRL+T:


You also have the option to catch the service data in the local memory.

Perform a preview on the last step (named Output):


This is basically the dataset which we want to be able to query from other applications.

Configure Carte

If you don’t already have a configuration file in the PDI root directory, create one:

vi carte-config.xml

And paste this xml in there (please adjust the path to the ktr file):
<slave_config>  
 <slaveserver>    
   <name>slave1</name>    
   <hostname>localhost</hostname>    
   <port>8082</port>    
 </slaveserver>  

 <services>  
   <service>    
     <name>lensStock</name>     
     <filename>/home/dsteiner/Dropbox/pentaho/Examples/PDI/data_services/lens_stock.ktr</filename>     
     <service_step>Output</service_step>   
   </service>
 </services>
</slave_config>

Save and close.
Let’s start the server now passing the config file as the only argument:
sh carte.sh carte-config.xml

Query service data from an application

Once the server has started successfully, you can access the service by any client of your choice as long as they support JDBC. Examples of clients are Mondrian, Squirrel, Pentaho Report Designer, Jaspersoft iReport, BIRT, and many many more.

For simplicity sake, we will just query the data service directly from Kettle:
  1. Click on the View tab.
  2. Right click on Database Connections and choose New Connection Wizard.
  3. Enter the following details:
DriverKettle Thin JDBC Driver (org.pentaho.di.core.jdbc.ThinDriver)
Hostnamelocalhost
Databasekettle
Port8082
Usernamecluster
Passwordcluster


Then click the Test button. Kettle should be able to successfully connect to our data service.


Finally, click OK.

Next we just want to execute a simple SQL query. In the View tab, in Database connections, right click on the connection name you just created and choose SQL Editor and insert the following query and click execute:

SELECT * FROM lensStock WHERE price_gbp > 100

Note that the table name is the service name that we configured earlier on in the carte-config.xml.
The returned dataset will look like this:


Some other applications ask for a JDBC connection string, which looks like this:
jdbc:pdi://<hostname>:<port>/kettle

Further Reading

You can find a lot more detailed info on the Pentaho Wiki.

Mondrian: Consequences of not defining an All member

$
0
0
To come straight to the point: If you do not define an all member for a hierarchy Mondrian will implicitly create a slicer with the default member of the dimension … this is even happening if you do not mention the dimension at all in your MDX query!

In example take following MDX:
SELECT
[Measures].[Sales] ON 0,
[Sales Channels].[Sales Channel].Children ON 1
FROM
[Sales]

If we take a look at the SQL that Mondrian generates, we suddenly see that it tries to restrict on the year 2012 in the join condition:


Why is this happening? The reason lies in the fact that one of the hierarchies of the date dimension does not have an All member. So Mondrian tries to find the first member of this hierarchy (as this is the default member), which happens to be [Year]. And as in this case I only had data as of the year 2012 in the date dimension table, it was used in the join.

<Hierarchies>
<Hierarchy name="Time"hasAll="false">
<Level attribute="Year" />
<Level attribute="Quarter" />
<Level attribute="Month" />
<Level attribute="Day"/>
</Hierarchy>
<Hierarchy name="Weekly" hasAll="true">
<Level attribute="Year" />
<Level attribute="Week"/>
<Level attribute="Weekday"/>
</Hierarchy>
</Hierarchies>


Note if we use a hierarchy of the Date dimension in the MDX then everything works as expected:


So it is really important to keep in mind what consequences not defining an All member has!

Pentaho Kettle (PDI): Get Pan and Kitchen Exit Code

$
0
0
Various monitoring applications require the exit code/status of a process as an input.

A simple example (test1.sh):

#!/bin/bash
echo "Hi"
exit $?

Let’s run it:
$ ./test1.sh
Let’s check the exit status (of the last command) which can be accessed via $?:
$ echo $?
0

Let’s take a look at how we can get the exit status from Pan and Kitchen:

For demonstration purposes we create a very simple dummy transformation which just outputs some data to the log:
Now create a shell file:
#!/bin/bash
/opt/pentaho/pdi/pdi-ce-4.4.0-stable/pan.sh -file='/home/dsteiner/Dropbox/pentaho/Examples/PDI/exit_code/tr_dummy.ktr' -Level=Basic > /home/dsteiner/Dropbox/pentaho/Examples/PDI/exit_code/err.log
echo $?

Note the echo $? in the last line which will return the exit status. This is for demonstration purposes here only. Normally you would use exit $? instead.

On Windows use instead:
echo %ERRORLEVEL%

Now lets run the shell script:
The exit status tells us that the transformation was executed successfully.

Next we will introduce an error into the transformation. I just add a formula step with a wrong formula:
We run the shell script again and this time we get a return code other than 0:
Any return code other than 0 means it is an error.

Please find below an overview of all the return codes (src1, src2):

Error Code
Description
0
The job ran without a problem
1
Errors occurred during processing
2
An unexpected error occurred during loading / running of the job / transformation, an error in the XML format, reading the file, problems with the repository connection, ...
3
unable to connect to a database, open a file or other initialization error.
7
The job / transformation couldn't be loaded from XML or the Repository
8
Error loading job entries or steps or plugins (error in loading one of the plugins mostly).one of the plugins in the plugins/ folder is not written correctly or is incompatible. You should never see this anymore though. If you do it's going to be an installation problem with Kettle.
9
Command line usage printing


Creating a clustered transformation in Pentaho Kettle

$
0
0

Prerequisites:


  • Current version of PDI installed.
  • Download the sample transformations from here.


Navigate to the PDI root directory. Let’s start three local carte instances for testing (Make sure these ports are not in use beforehand):

sh carte.sh localhost 8077

sh carte.sh localhost 8078
sh carte.sh localhost 8079

In PDI Spoon create a new transformation.

Click on the View tab on the left hand side and right click on Slave server and choose New. Add the Carte servers we started earlier on one by one and define one as the slave server. Note the default carte user is cluster and the default password is cluster.
Next right click on Kettle cluster schemas and choose New.
Provide a Schema name  and then click on Select slave servers. Mark all of them in the pop-up window and select OK.
Next we want to make sure that Kettle can connect to all of the carte servers. Right click on the cluster schema you just created and choose Monitor all slave servers:
For each of the servers Spoon will open a monitoring tab/window. Check the log in each monitoring window for error messages. 

Additional info: Dynamic clusters
If the slave servers are not all known upfront, can be added or removed at any time,  Kettle offers as well a dynamic cluster schema. A typical use case is when running a cluster in the cloud. With this option you can also define several slave servers for failover purposes. Take a look at the details on the Pentaho Wiki.

If Kettle can connect to all of them without problems, proceed as follows:

How to define clustering for a step

Add a Text input step for example.
Right click on the Text input step and choose Clustering.
In the Cluster schema dialog choose the cluster schema you created earlier on:
Click OK.
Note that the Text input step has a clustering indicator now:
Note: Only the steps that you assign the cluster schema this way will be run on the slave servers. All other ones will be run on the master server.

Our input dataset:

Creating swimlanes

In this example we will be reading the CSV files directly from the slave servers. All the steps will be executed on the slaves (as indicated by the Cx2). 

To run the transformation on our local test environment, click the execute button and choose Execute clustered:

The last option Show transformations is not necessary for running the transformation, but helps to understand how Kettle creates individual transformations for your slave servers and master server in the background.

As we test this locally, the results will be read from the same file twice (we have two slave servers running locally and one master server) and will be output to the same file, hence we see the summary twice in the same file:


Debugging: Observer the logs of the slave and master servers as the main transformation log in Spoon (v4.4) doesn’t seem to provide you an error logs/messages in clustered execution. So always monitor the server logs while debugging!
Preview: If you perform preview on a step, a standard (non-clustered) transformation will be run.


Summarizing all data on the master

Now we will change the transformation so that the last 3 steps run on the master (notice that these steps do not have a clustering indicator):
If we execute the transformation now, the result looks like this:
So as we expect, all the data from all the slaves is summarized on the master.

Importing data from the master

Not in all cases will the input data reside on the slave servers, hence we will explore a way to input the data from the master:

Note that in this case only the Dummy step runs on the slave server.

Here is the output file:
So what happens is that the file will be input the data on the master, records will be distributed to the dummy steps running on the slave server and then aggregated on the master again.

My special thanks go to Matt and Slawo for shedding some light into this very interesting functionality.

Partitioning data on clustered Pentaho Kettle ETL transformations

$
0
0

This is the second article on clustering ETL transformations with Pentaho Kettle (Pentaho Data Integration). It is highly recommended that you read the first article Creating a clustered transformation in Pentaho Kettle before continuing with this one. Make sure that the slave and master servers are running and the cluster schema is defined - as outlined in the first article.

Prerequisites:

  • Current version of PDI installed.
  • Download the sample transformations from here.

How to create a partitioning schema

Create a new transformation (or open an existing one). Click on the View tab on the left hand side and right click on Partition schemas. Choose New:
In our case we want to define a dynamic schema. Tick Dynamically create the schema definition and set the Number of partitions by slave server to 1:

How to assign the partition schema

Right click on the step that you want to assign the partition schema to and choose Partitioning.
You will be given following options:
For our purposes we want to choose Remainder of division. In the next dialog choose the partitioning schema you created earlier on:
Next specify which field should be used for partitioning. In our case this is the city field:
That’s it. Now partitioning will be dynamically applied to this step.

Why apply data partitioning on distributed ETL transformation?

As we have 2 slave servers running (setup instructions can be find in the first article), the data will be dynamically partitioned into 2 sets based on the city field. So even if we do an aggregation on the slave servers, we will derive a clean output set on the server. To be more precise: If we don’t use partitioning in our transformation, each slave server would received data in a round robin fashion (randomly), so each data set could contain records for New York in example. Each slave creates an aggregate and when we combine the data on the master we can possibly end up we two aggregates for New York. This would then require an additional sort and aggregation step on the master to arrive at a final clean aggregate. To avoid this kind of scenario, it is best to define data partitioning, so that each slave server receives a “unique” set of data. Note, this is just one reason why you should apply partitioning.

No partitioning schema applied:
With partitioning schema applied:
Notice the difference between the two output datasets!

Also note the additional red icon [Dx1] in the above screenshot of the transformation. This indicates that a partitioning schema is applied to this particular step.

At the end of this second article I hope that you got a good overview of the Pentaho Kettle clustering and partitioning features which are very useful when you are dealing with a lot of data. My special thanks go to Matt and Slawo for shedding some light into this very interesting functionality.

Advanced routing in Pentaho Kettle jobs

$
0
0

In this article we will take a look at how to create some complex routing conditions for a Pentaho Data Integration (Kettle) job.


Out-of-the-box Kettle comes already with several easy to use conditional job entries:

In some situations though you might need a bit a bit more flexibility, this is when the JavaScript job entry comes into play:
This one is found in the Scripting folder. The name used in the configuration dialog of this particular step is from my point of view better actually better suited: Evaluating JavaScript.

We will look at a very trivial example:
In this job flow we only want to execute the Write To Log Sunday job entry if the day of the week is a Sunday. On all other days we want to execute the job entry Write to Log.

The Evaluating JavaScript job entry is configured as shown in the screenshot below:
Note that you can write multiple lines of code, but you must make sure that the return value is a boolean value!

In case you want to create this example yourself, please find below the JavaScript code:
var d = new Date();
var dof = d.getDay();
dof == 6 ? true : false;

Running this ETL process on a Wednesday will show the following in the log:

As you see it is rather simple creating more complex conditions and the bonus is that you can make use of a scripting language which you probably already know: JavaScript.

More information about this job entry can be found on the Pentaho Wiki.

You can download the sample job file from here. This file was created in PDI 4.4 stable, which means that you should only open it in PDI 4.4 or newer.

New London Pentaho Usergroup meetup

$
0
0
It's been a long time since the last London Pentaho Usergroup meeting happened, so it's good to see that Dan Keeley and Pedro Alves are trying to bring new life into the Usergroup by organizing a new meetup. So if you live in or around London or happen to visit London on the 20th of June,  make sure you stop by (details here on the Meetup website).
It's a great opportunity to get to know key members of the Pentaho Community as well as supporters and fans and to share your ideas with them.
Matt Casters, the founder of Kettle, will be presenting how to use Pentaho Kettle (PDI) to create MapReduce jobs via an easy to use graphical interface. It's unique opportunity to learn about this!
So I hope I see some of you there and have an interesting discussion about data integration, business intelligence etc with you!

Pentaho Report Designer: How to show the parameter display name in your report when it is different from the parameter value

$
0
0
One of my blog's readers just asked me quite an interesting question: How can I show the parameter display name in my Pentaho report if it is different from the parameter value?


Note: Just to clarify, the scenario covered here is when the parameter value and display name are different. So in example when you set the parameter value on an id field and the name on the descriptive field. Because if parameter value and display name are set to the same field, then you can simply drag and drop the parameter name onto your report.


So in our case we defined a parameter called PARAM_OFFICECODE. We set the Parameter Value to OFFICECODE (which happens to be an id) and the Parameter Display Name is set to CITY. We want to use the OFFICECODE to constrain the result set of our main report query (in our case this works better because there happens to be an index on this database table column).

In the report we would like to show in the header the selected office name (CITY) ... but how do we do this? We can not just simply drag and drop the PARAM_OFFICECODE element onto the report header, because it would only display the id (OFFICECODE) and not the display name (CITY).

You might think there should be an easy solution to this … and right you are. It’s just not as easy as it could be, but quite close …


So I quickly put together a bare bone example (don’t expect any fancy report layout … we just want to see if we can solve this problem):


Our parameter:
So if we placed this parameter element on the main report, we would just see the OFFICECODE when we ran the report. So how do we get the display name?


  1. If it is possible to access the name field (in our case CITY) via the SQL query, we could change our main report SQL query and add it there as a new field. But this is not very efficient, right?
  2. We could create a new query which takes the code/id (in our case OFFICECODE) as a parameter and returns the name (CITY) and then run this query in a sub-report which could return the value to the main report (this is in fact what you had to do some years back). Well, not that neat either.
  3. Here comes the savior: The SINGLEVALUEQUERY formula function. You can find this one in the Open Formula section. Thomas posted some interesting details about it on his blog some time ago.


Basically for a very long time we had the restriction that we could only run one query to feed data to our report. With the SINGLEVALUEQUERY and MULTIVALUEQUERY formula functions you can run additional queries and return values to the main report.


So here we go … to retrieve the display value:
  1. We create an additional query called ds_office_chosen which is constrained by the code/id and returns the (display) name: SELECT city AS office_chosen FROM offices WHERE officecode = ${param_officecode}
  2. We create a new formula element called formula_office_chosen and reference the query ds_office_chosen: =SINGLEVALUEQUERY("ds_office_chosen")
  3. We can now use formula_office_chosen in our report:


Once this is set up, we can run the report and the display name of the chosen parameter value will be shown:
My very simple sample report can be downloaded from here.
Viewing all 85 articles
Browse latest View live